Pantone color Everglade. You’ve seen it. Deep, jewel toned, aquatic bluish-green that is boldly taking up space that used to be reserved for black. I’m sure you noticed it creeping up in stores and even home decor. Since Pantone named it’s younger sister ‘Greenery’ color of the year in 2017 this deeper blue/green color has slowly made it’s way to becoming a supporting actress in many trend-based pallets. While it’s full of personality and drama, it’s still versatile enough to masquerade as a replacement for black when smartly coordinated into a wardrobe or color-scheme. It also looks great on all skin-tones (including my olive skin).
Since black is out of the question for next Spring, I set out to find the perfect combination of silhouettes and colors to replace the staple ‘little black dresses’ in my closet. That’s why I grabbed See & Sew’s B6437 on the spinner rack. Seemed really straight forward and classic.
This fabric was also a Sewfisticated Discount Fabrics find. They had this material in piles of different tonal shades of blues, greens, pinks, grays, and purples. Again, this fabric and the colors it came in had no business in a discount store so for only $3.99 a yard this fabric was a steel. The color is rich and the material is soft and luxurious. While I was waiting in line to get my mountain of fabric cut, the woman behind me (who was wearing a home-made maxie dress under her winter coat) reached out and touched the bolt in my arms. “This is just perfect. What are you making with this?” I told her my plans and even showed her the picture of B6437 on my phone. She nodded with approval but then put her finger up to the screen and pointed to the collar. “That collar is not for you” she said. “You should make it boat neck.” “Really?” I asked. “Oh, yes. Think about it like a Greek Goddess type of dress”. She then moved her hijab a little to one side and showed me the collar to her maxie dress which had no attached piece, just a simple scoop neck hem. “Like this. You’ll see.”

So, off I went to sew my simple, trendy, easy to sew dress (passive aggressively rolling my eyes at myself as I type this). I did a little research online about the difference between sewing with woven fabric and stretch knit. There’s a lot of great advise out there and although I retained it, I naively decided to just wing it and give it a go on stretchy material. I originally thought ‘eh, you just sew with a zig-zag instead of a straight stitch and then no zipper at the end. No problem!’ So I grabbed some different, super-discounted, one-way stretch knit I found on the floor in the back aisle of Joanns and gave it a go. Wholly Molly! What a disaster. First off, I cut the one-way stretch fabric incorrectly. I cut the fabric so that it stretched length wise instead of horizontally. So even if I had sewed it right, I wouldn’t have been able to get it up over my head. But as you will learn to know, when I fail, I fail in more ways then one. I tried, and tried but I just couldn’t sew the v-neck collar to my practice attempt of B6437 properly. Finally, after wasting 3 yards of stretch knit, and spending about an hour on youtube, I properly sewed in a collar. It was mangled, crooked, and torn in two places where it had gotten stuck in the machine, but it was a collar. At that point there wasn’t even enough material to make anything out of the bodice. But I had done it and I felt ready to move onto the Everglade material. If only for the sake of failing and moving on.
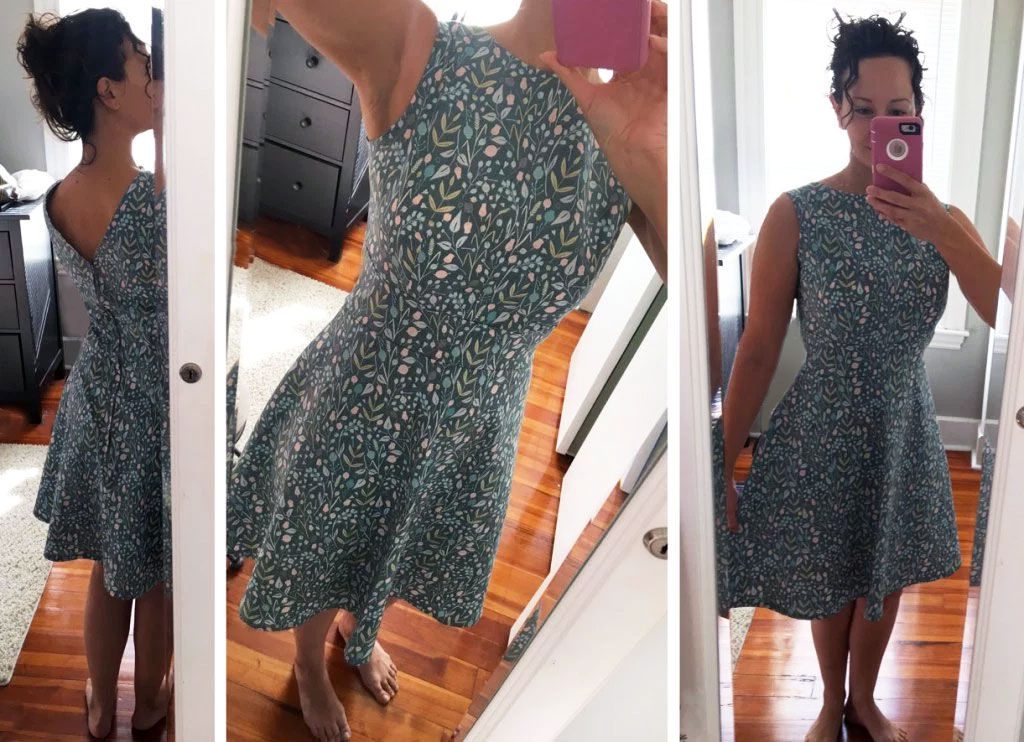
So, armed with the knowledge that I had no idea what I was doing, I started to apply the advice from youtube heros. I purchased a twin needle, used tissue paper under the fabric (so that it didn’t get caught in the machine), and lowered my expectations. Here is what it looked like when I was done. A couple of little dimples here and there (unnoticeable in dim light really) but the worst part was (as expected) the collar. I looked upon my dress with tired eyes and realized it was just too wonky to wear. But, my memory went back to that day in line at Sewfisticated and the advice from the woman behind me. Taking up my shears. I did a little surgery and removed the cursed collar.
 Bam!! What a difference! It’s like a whole new dress! Can you believe it? With just that one simple change this dress became one that I’m super proud of and can’t wait to wear. In February my husband and I are traveling to St. Lucia with friends. Immediately after I took this picture I carefully hang up this dress with the rest of the resort wear that I’ve chosen to pack for the trip. I can’t wait to wear this dress in February as well as to parties and outdoor lunches this coming spring (and into summer!). B6437 had become a project that I was dreading and embarrassed about. It became something I needed to ‘get through’ so that I could learn, fail and move on. I was (in all honesty) calling it ‘The Disaster’ to my friends and husband. Now it’s an elegant dark horse that has won it’s spot in my closet usually reserved for my little black dress. Thank you mysterious woman at Sewphisticated Fabrics. You were right.

 New Look 6415
 I’m so happy I decided to start sewing. At first I thought I’d focus on Spring apparel because it would take me so long to make each individual garment. I thought that it would give me plenty of time between now and then to create some fun pieces and it would be an interesting winter project to distract me from art for a while. But I’m so happy to discover that I can make simple tunics and shirts like this in just a couple hours. Even with going super slow and triple checking everything. I’m hooked on sewing and I’m done with fast fashion from stores. From now on it’s perfect colors to compliment my skin tones, silhouettes and details of my choosing, and (of course) Smedium! If I had known sewing my own clothes was going to be this easy and rewarding I would have started it long ago.
 If Simplicity 1520 is the Hyundai of pajama pants, McCall’s M7875 is certainly the Mazda. Sporty, fun, and just the right amount of zippy bells and whistles (without sacrificing practicality). After S1520, M7875 was just as easy, but with a greater reward. Pockets, piping, drawstring, and bottom cuffs. I have to say, this McCalls pattern had the same section of confusing, convoluted steps that Simplicity’s had. I was kind of bummed because I was hoping McCall’s version would be easier to decipher so that I could finally understand what the heck-a-roo they wanted me to do. But, nope. I resorted to applying the different technique I had learned from Youtube and I had no issues whatsoever doing it that way.
 Well, I thought that I wouldn’t bother with Black Friday ever again, but 70% off of fleece for a newly addicted sewing junky is just too hard to resist. First, I traveled back to Somerville and filled my arms with fabric from Sewfisticated. Then I immediately drove to Joann’s and picked up some of the ‘door buster-riffic’ fleece. I also picked up Simplicity pattern 1520.
 After completing the maxie dress from the previous post; I still had a bit of the Everglade colored fabric left. Encouraged by my not-so-failing-as-I-think-I-am experience with stretch it seemed fitting to keep going and see if I could keep improving. I had picked up Butterick B6418 during an amazing sale. Like many others before me, I recognized it’s potential and saw all the numerous ways it could come in handy in the future. The opportunity for different fabric variations seemed like a lot of fun; but since I’ve never made a tunic with real sleeves like this, and so it seemed the wise thing to do would be to make the basic silhouette as a sample. That way I could be sure it would fit and that it actually look good before spending the cash on coordinating knit and lace. I used all of the remaining Everglade fabric (Guess I’ll have to get back to Sewfisticated). I have pretty much nothing left except some scraps to make scrunchis or something.


 McCalls 7599
 The crowing jewel of this mother load was this blue watercolored floral that was obviously a product sample. When the store owner commented on my purchases she pointed out this fabric and claimed it was for 2020 spring. I’m not confident if it’s for 2020; but I would not be surprised if it was intended for 2019. I wish I could tell you who produced or designed the fabric, but as it was just a manufacturer’s sample, there are little to no clues. The salvage is just a secret code which was misprinted anyways. It’s scary to think, but quite possible, that this fabric was passed over by the merchandisers and it won’t be moving forward to the market (hence why it wound up in a discount store). That would be such a shame. I mean LOOK at it.. it’s beautiful!


 New Look pattern #6447